Custom fields - attributes

Custom fields collect additional information and store it against users. This information is stored on the User details page on the Details tab under the Other details section and can consist of one of the following field types:
| Text | Multi-line text | |
| Phone | Number | Radio |
| Currency | Date (single) | Date and time |
| Date (period) | Rich text | Drop-down list |
You can use a custom field to store external reference numbers/information against your users, allowing you to easily cross-reference them. (See Unique below). Examples of this could be to store the User IDs of your users from your CRM package. This will allow you to search users using the values entered and also update user details through the import process by referencing those IDs.
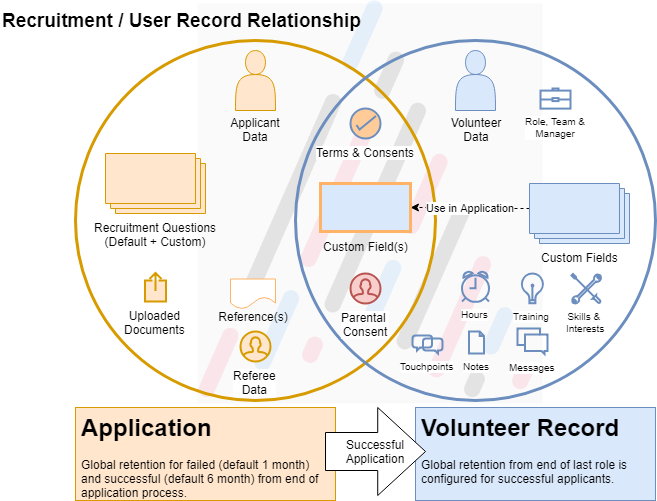
A custom field can be configured to be collected during the application process, or user creation. After which it remains with the user record as noted above on becoming a volunteer.
If the data is not relevant beyond recruitment, consider using a Recruitment Question instead.
Custom fields can also be restricted to specific roles, ensuring only relevant data is requested. For example for the role of "Patient driver", the organisation may need to store the expiry date of a user’s drivers licence; however, this information may not be relevant for someone who has a role of “Social media outreach”.
Another example of custom fields would be to collect marketing/newsletter preferences of your users. (See video below).
Add/modify custom fields (attributes)
Category
First, you have to set up the attribute category. e.g. Marketing & Newsletter Preferences. Drag and drop the "Category" type from the right column to the left and place it in the required position and then press the "Save" button.
You can edit the title of your category by hovering over it pressing the "Edit" button that appears.
If the category has no custom fields, if you hover over it, a "Delete" button will also appear.
User custom field (attributes)
Once you have configured your custom field categories, you can add custom fields for each category.
Drag and drop the desired attribute field type from the right column to the appropriate category.
You will then be asked to enter the field name and then select the following options:
Field details:
- Indexable (searchable): If this is ticked, then the values of this field will be searchable using the Universal Search.
- Unique: If this option is ticked, then the value of this field must be unique for each user. Ticking this will also mark the attribute as Indexable.
- Show on user creation: This means that the attribute will be shown to managers on user creation page. (Please note that this will not be compulsory for managers even if it has been ticked as compulsory on application.)
- Encrypted: Ticking this will further encrypt the data on Assemble. This should be used for collecting sensitive personal data. Please note that encrypted data cannot be indexable which means it cannot be searched.
Role profiles
Select the roles you would like this attribute to be associated with. If you do not select any roles, then the attribute will be available for all roles. It is good practice to ensure that you are only collecting data from the users that need to provide information. For example, if a certain role does not require the collection of driver licence expiry date or number, then that attribute should only be associated with those roles.
Application form
Custom fields are normally collected from volunteers rather than users. This means that on default, they are not displayed to users on their application form. However, there may be instances where you want to collect certain information as part of their application and need this information to be transferred to their user record once they complete recruitment.
The options on this section allow you to decide if you want to do so and decide if they should be compulsory.
Custom field marked to be collected during the recruitment process must have the "write" permission set to self. Otherwise, the system won't record the applicant answers.
Caution
It is good practice to only collect information at the stage you need to process that information. For example, it may not be relevant to collect certain custom fields against a user until they have been recruited. So, you should only collect custom field data from applicants if it is part of your decision-making process to recruit them.
Custom fields can be linked to a dropdown activity outcome. This allows the activity outcome dropdown to be populated by the user attributes. This functionality can be used to provide a list of items to each volunteer which they can then select from when filling out activity outcomes.
For set up instructions see activities categories & outcomes.
Permissions (access type)
Finally, for each attribute, you have to decide what type of access each permission group has by assigning them one of the following:
- Hidden: Not displayed
- Read: Read only
- Write: Read & write
This is done by going to the above-mentioned access types and clicking on the field next to it which will bring up the list of your permission groups. You can then click on there to assign that permission. A permission group can only be assigned to one access type.
Self
For each attribute, you must also decide if a user is able to access that information through their own profile by assigning a system permission group called "Self" to the appropriate access type.
Removing (deleting) custom fields
If you press the "Remove" button for an attribute, you will be asked for confirmation. Pressing the "Yes, delete it" button will permanently delete not only the attribute but also all the data collected against users.
Warning
Once you delete an attribute, the data stored against your users are permanently deleted. There is no way to restore the data.
Required permission(s)
- Super Admin: Manage user custom fields