Teams (hierarchies)

Assemble supports an unlimited level and number of teams, sometimes referred to as hierarchy locations. The Teams setting allows you to configure Assemble to reflect the structure of your organisation.
In addition to their role profile, each user must be placed in a team for that role, within your organisation. This will determine who can manage them and, if they are a supervisor, who they can manage. Therefore, it is important to make sure that your teams are configured in a logical manner that reflects your organisation's structure as it applies to volunteering.
It is also important to point out that a manager will always be able to manage the users in the team they are placed in, along with all teams below their team. Therefore, as an example, if your organisation has regions, by placing a regional manager at the region level, they will automatically be able to manage the user in any further teams that are directly connected to and are below their team.
Below is an example team structure a national organisation may have.
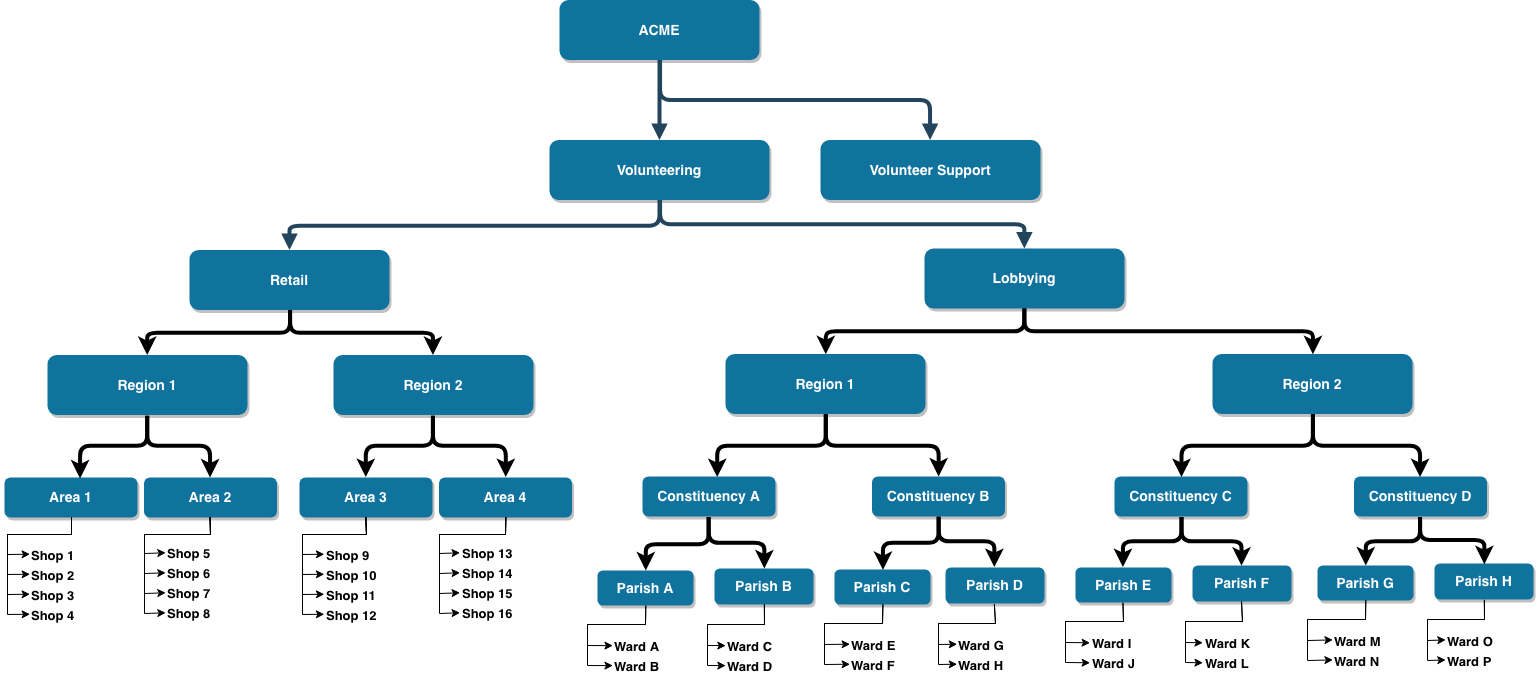
In this scenario, a manager placed in the Lobbying team will be able to manage all of the users within Region1 and Region2, in the Constituency teams, all of the Parish teams and all of the Wards.
Add teams
By default, Assemble will have two levels of teams already configured with the top team inheriting the name of your organisation. Below that, you will find a team called "Volunteers" which you can rename if you want.
To add a new team below another one, just hover your mouse over the row of the parent team and then you'll see More actions button appear. Click there and select Add sub-team. If you want to add another team at the same level eg a Region 3 in the hierarchy above, select Add same level team.
Team/hierarchy item name
Enter the name of the team. For example: "South West". Make sure that your teams are easily identifiable in a list without the help of the hierarchy. In the scenario above, Region 1 (Lobbying) would help distinguish it from Region 1 (Retail).
Description
This optional field allows you to enter further description of the team.
Location
If the team you are setting up is a physical location such as a shop/office, you can find its address and assign it to the team. Whenever you publish an event/opportunity to a team, then the location will be pre-loaded. Important: Please add the team first then edit it to add location.
Icon
When adding a team, you can use the built-in icons to help you visualise the team location. Having an established naming and icon system makes sure that there's consistency, especially where you have hundreds of teams.
External reference
This is an optional field to allow you to store an external reference ID for the team. This is used for syncing your system with external system through the API, for example.
Edit teams
To edit the team, hover your mouse over the row for that team click the Edit button to modify its details. You can change all of the details - remember to update/save the changes.
Delete a team
It is not possible to delete a team. You can, however, mark them as hidden where you will not be able to have any volunteers in it or be able to recruit anyone to it. You can only mark a parent team as hidden if all its children are hidden also. To hide a team, hover your mouse over the team's row and click Hide.
Hiding a team that still has volunteers in it will result in a prompt for you to say what action should be taken with these volunteers. You can choose to begin the leaving process for all volunteers in the team or transfer them all to a different team. If some are leaving and some transferring you should complete one of those options within the user record screens first.
You cannot hide a team where there are published opportunities linked to it. Please either take the opportunity offline or change the team of the opportunity first.